Cooking Pork Ribs - Your Guide
For Baby Back Ribs and Spare Ribs
Cooking pork ribs to tender, smoky perfection is a topic that invokes impassioned discussions by backyard chefs, professional pit masters and just about anyone who loves cooking barbecue ribs. Why?
Well, everyone has their own particular technique. Some people prepare ribs based on experience and maybe a bit of tradition. Other methods are regional, being influenced by the wood and equipment available, even the climate.
What I'm presenting here is not the be all, end all to cooking pork ribs. It is a guide that will get you started and, if followed, will produce some fantastic results.
However, experimentation is part of what makes cooking pork ribs so much fun! So I hope you will take what you learn here and run with it.
Choosing Your Ribs: Spare Ribs vs Baby Back Ribs

Baby Back Ribs
Baby back ribs come from the loin section of the hog, which is at the top of the rib cage. Hence, baby back ribs are also called loin ribs, back ribs or loin back ribs. The word "baby" comes from the fact that loin ribs are smaller and less meaty than spare ribs. However, they are more expensive, because they have less fat and are more tender.

Spare Ribs
Spare ribs come from the belly of the hog and are bigger and meatier than their baby back brethren. They also have more fat, which means more flavor.
What You'll Need
Here's a list of some of the things you'll need for your cooking pork ribs "adventure".
Charcoal: Briquettes. You can use lump charcoal as well and some "purists" prefer it. However, the uniform shape of briquettes makes it easier to get a consistent temperature in your smoker. So let's use briquettes for now.
Chimney Charcoal Starter: Since you're not using lighter fluid OR match-light briquettes, using a chimney starter is the easiest way to start your charcoal.
Hardwood for Smoking: I like to use a combination of oak or hickory and fruit woods like apple, peach, or cherry. But you can use whatever you like. Just buy wood chunks or splits, not chips.

Digital Oven Thermometer: You must know the temperature inside your grill/smoker when cooking pork ribs. The thermometer that came with your grill is usually inaccurate because it gives you the temperature at the top of the grill where it is located - not at the grill grates where the meat is located.
I use and highly recommend the Maverick ET733 Wireless BBQ Thermometer Set. It's two thermometers in one -- one probe goes into your meat and other into your grill or oven. But it also has a remote unit that you can keep in your pocket or in the house that let's you know the temperature of your food and grill.
BBQ Rub. You can make your own or use your favorite store-bought rub.
Large Freezer Bags and Heavy Duty Aluminum Foil: The freezer bags are for storing your ribs in the refrigerator after you season them. You could also use plastic wrap. The foil is for "foiling your ribs", which means wrapping in them in foil to continue cooking after they've been on the grill for a few hours.
Preparing Ribs for Cooking
When it comes to cooking pork ribs, the method is very similar for both spare ribs and baby backs. However, prepping spare ribs requires a bit more work. So in this section we will concentrate on spare ribs.
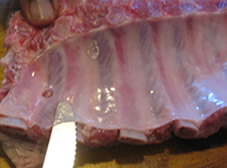
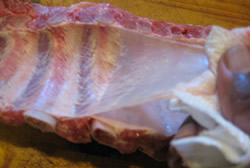
First, you want to rinse your ribs with cold water and blot them dry. Next, remove the thin, tough membrane found on the bone-side of the ribs. This can be a little tricky sometimes because it easily tears. But with practice, the process becomes quite simple.
You start by taking a knife and working it under the membrane until you loosen it. After lifting it, you may see what appears to be another layer of membrane. Do not remove it. This second membrane is needed to hold the ribs together. The membrane is difficult to pull with your bare hands, so take a paper towel, grasp it and gently pull it off.
 Knife Under the Membrane |
 The Membrane Being Removed From Spare Ribs |
This technique also applies when removing the membrane from baby back ribs.
 |
 |
Next, remove the skirt, which is a flap of membrane-covered meat on the bone side of the spare ribs. Note in the photos above that there is no skirt meat on the baby back ribs. You can also see that baby back rib bones are shorter and more curved than the longer and straighter spare ribs.

Removing Skirt Meat from Spare Ribs
At this point you could apply your BBQ rub and cook your spare ribs as-is. However, for more even cooking and better presentation, many people - myself included - trim their ribs "St. Louis Style" or "St. Louis Cut".
St. Louis Cut (aka "SLC")
Trimming your spare ribs St. Louis Cut or SLC style involves removing the skirt, brisket, and point meat from the slab (see photo below).

Again, this is not necessary. However, trimming your spare ribs SLC style gives the slab nice, even dimensions which makes for easier cooking (no extra thick or thin portions that can be under- or overcooked).
Baby back ribs are already sold as even, rectangular slabs. So trimming them is unnecessary.
Next, rub your ribs with oil or mustard. You won't taste the mustard when the ribs are done. The oil and mustard just helps your rub to better adhere to the meat.
If you do apply oil or mustard to your ribs, just sprinkle your rub on the meat and wrap them or, if necessary, just pat-down the BBQ rub on the ribs as you sprinkle it on. Do NOT try to massage the rub into the meat's surface. This will just create a paste that mostly ends up on your fingers instead of the ribs.
Cooking Pork Ribs
We're now going to discuss actually cooking the ribs.
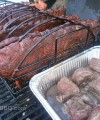
First, you want to set-up your grill for low, indirect heat. This basically means having your charcoal on one side of your grill and the meat on the other side so that the meat is not directly over the coals.
Needless to say there are numerous methods for cooking ribs. However, one of the most simple and straight-forward techniques, especially for beginners, is the 3-2-1 method for spare ribs and the 2-1-1 or 2-2-1 method for baby back ribs.
The 3-2-1 Method
The numbers in both the 3-2-1 and the 2-1-1 methods are cooking times in hours. For the 3-2-1 method, the entire process goes like this:
3 hours: During the first three hours you smoke your ribs at a temperature of 225°F - 240°F.
Add wood to your coals every 30 minutes or so, just to keep the smoke steady. You don't want thick plumes of billowing white smoke pouring out of your grill/smoker. That's too much smoke and it will ruin the taste of your meat. You want to see good "blue" smoke.
An excellent picture showing the difference between the two kinds of smoke can be found here: The BBQ Brethren Forum.
2 hours: After the first three hours, wrap each slab of ribs in two layers of heavy duty aluminum foil. This is called "foiling your ribs" (aka "The Texas Crutch"). As you do this, be careful not to puncture the foil, especially with any pointy edges of meat or bone. If you like, you can add a little apple juice or some other liquid to the bottom of the foil pouch before closing it. Then you put the ribs back on the grill or in the oven for an additional two hours. Keep the heat at 225°F.
1 hour: In the last hour of the 3-2-1 method, you take the ribs from the oven, remove them from the foil and place them back on the grill to finish cooking and firm-up a bit.
You do the same thing for baby back ribs using a 2-2-1 or 2-1-1 method. You simply adjust the cooking and foiling times accordingly.
 |
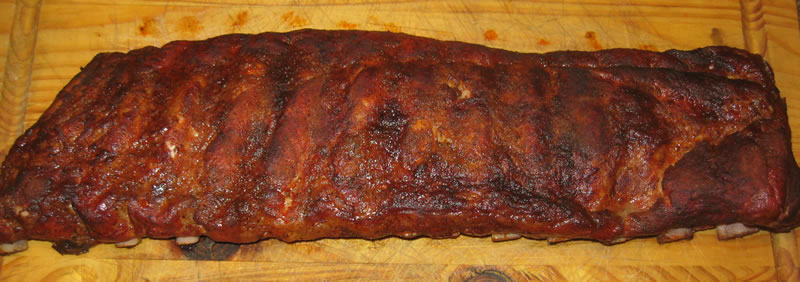
As you can see in the picture of the spare ribs above, the bark is excellent. And the meat really receded from the bone, giving you an indication of how done they were.
The baby back ribs below also had a wonderful bark - not at all chewy or crunchy, just nice and tender.
 |
If you want your ribs to have that slightly charred, crusty exterior then when they're almost done, quickly grill them directly over the charcoal. Or you could try a combination of saucing your ribs and using more direct heat in the final 15-20 minutes of cooking.
That's it! Drop me a line if you have any questions.