Master the grilling basics and other Barbecue tips and techniques
I assume you've clicked on this page because you want to learn the basics of grilling or some other barbecue tips and techniques, as the title of the page suggests.
Well I'm glad you're here. This guide will save you a bit of frustration and maybe even some hard-earned money.
After all, if you're grilling Ribeyes or barbecuing spareribs, the last thing you want to end up with is some well-seasoned jerky.
And that's why I begin this grilling basics guide with a friendly suggestion...
If you're new to grilling or barbecuing, start out with something simple. Try some chicken wings first. Chicken is inexpensive and it won't hurt as much if you goof-up - at least when compared to ruining a good Porterhouse. You could also grill some pork chops.
For barbecuing, do a pork picnic shoulder. It's a good, inexpensive cut to practice with. And if you don't get it just right, it's forgiving - you'll still enjoy eating it.
Whatever you do, though, just have fun with the process. Now let's get started...
Starting Your Charcoal Grill
When I was a kid, starting your grill meant dousing the charcoal with lighter fluid, tossing a lit match on it and watching that "whoosh" of flame go up in the air.
Man, I couldn't wait until I was old enough to do that.
However, a less hazardous method for lighting both lump charcoal and briquettes is the use of a chimney starter.
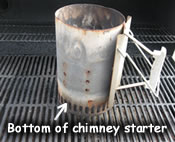
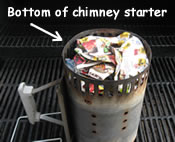
Using a Chimney Starter
To use a chimney starter, you begin by putting a "few" pieces of "loosely" crumpled newspaper in the bottom, adding your charcoal inside the chimney starter, and then lighting the newspaper. No lighter fluid is needed.
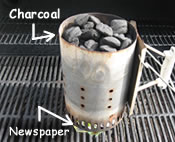
Initially, you might be inclined to use a lot of paper thinking this will make it easier to get a good fire going. However, if packed too tightly, air cannot adequately circulate in amongst the pieces of paper, making combustion much more difficult. Three sheets of crumpled newspaper will work just fine.
Don't place the chimney starter on your cooking grates or on your driveway concrete. There will be lots of ashes from the burnt newspaper and a bit from the charcoal. You don't want the hassle of cleaning this off of your grill grates nor do you want a burn mark on your concrete or backyard tile.
As the newspaper burns, there will be a lot of smoke. This is normal. Soon the charcoal will ignite.
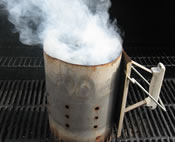
The charcoal is ready when the bottom coals glow orange/red and a few of the coals near the top have begun to ash-over by turning white around the edges. This will take 15 to 20 minutes.
At this point you simply pour your charcoal into your grill. (For your protection, be sure to wear BBQ gloves or oven mitts).
Now that was your first lesson in Grilling Basics 101. That wasn't too painful, now was it?
Lump Charcoal or Briquettes
Lump Charcoal
Purists say that natural lump charcoal gives food a "cleaner" taste than briquettes. Personally, I've never been able to discern any sort of after-taste when using regular briquettes and I've used both.
Lump charcoal does light more quickly and burn faster than briquettes. But that faster burn can make heat control more difficult.

Lump Charcoal
Charcoal Briquettes
Charcoal briquettes are easier to work with due, in part, to their uniform shape and size. This results in better heat control and more predictable results when you're just starting out.
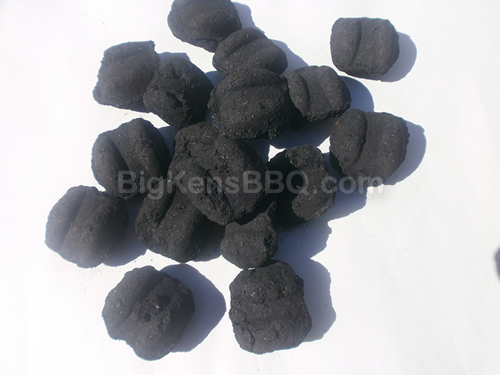
Charcoal Briquettes
I do recommend choosing a good, well known brand. In my area, Kingsford is readily available. But do NOT use the "Match Light" version. Match Light briquettes contain additives such as lighter fluid, which can definitely affect the flavor of your food.
What is my personal preference? All natural hardwood briquettes. It's the best of both worlds.
Next, we'll continue our grilling basics by discussing tips and techniques for different ways to grill.
Different Ways to Grill
Direct Grilling
Simply put, direct grilling means placing your food directly over the heat source. This method typically utilizes medium-high to high heat.
Good stuff like steak, chicken breasts, sausages, and fish fillets are typically cooked using the direct grilling method.
Indirect Grilling
Indirect grilling is accomplished by setting-up your grill so that the coals are on one side and your food is placed on the opposite side.
You can also put your coals on both sides of the grill, leaving the center without coals and placing your food there.
You're essentially turning your grill into an outdoor oven. This allows you to cook large pieces of meat or a whole chicken without burning the outside.
Indirect grilling is often done at medium to medium-high heat.
However, you can certainly do indirect grilling with high heat temperatures. In fact, that's how I often grill chicken pieces (but not the whole bird). That way I never have to worry about flare-ups.
This leads us to our next grilling basics technique.
The Zone Method
No grilling basics guide would be complete without a discussion of the Zone Method. This involves cooking with both direct and indirect heat by setting-up your grill with two or three heat "zones".
Zone 1: Arrange your coals in a double layer on one side of your grill for high direct heat.
Zone 2: Towards the middle of your grill arrange your coals in a single layer for low direct heat.
Zone 3: On the other side of your grill do not put any charcoal. This will provide indirect heat and a safe-zone for any flare-ups.

3-Heat Zones: High heat, low heat, warm or no-heat.
3 Heat Zone Grill Method
This method is ideal for quickly searing your meat in Zone 1 and then letting it finish cooking in either Zone 2 or Zone 3.
Just make sure Zone 2 or 3 is at the correct temperature to cook your meat as indicated by any recipe you're following or as noted in my grilling temperatures guide.
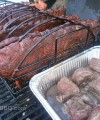
Barbecuing/Smoking
"Low and slow" is what we call this method. It means cooking over low to medium-low (225° to 275°F), indirect heat slowly for long periods of time using wood smoke to help flavor the food.
Traditionally, a horizontal barrel smoker with an offset firebox is used for barbecuing and smoking. However, many people use your Weber Kettle-type grills with great success as well.
What it all boils down to...
The bottom line, really, is heat control. That's the essence of this grilling basics guide.
Knowing the temperature at which you're supposed to be cooking, getting your grill to that temperature and then keeping it there can be challenging, but it just takes patience. You can do it!
The grilling basics discussed above, along with a little practice, will have you well on your way to the coveted title of "pit master" in no time!